FOR SALES & SUPPORT +961 1 451245
 +961 71 333850
HAVE AN INQUIRY? EMAIL US: INFO@SATERMED.COM

Menu
Categories


Product Information
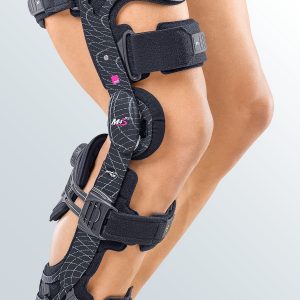
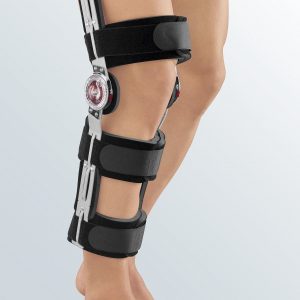
4-point rigid brace for treating injuries of the posterior cruciate ligament
Knee brace for treating the posterior cruciate ligament
M.4s PCL dynamic is a functional knee orthosis. The product allows the conservative or postoperative treatment of patients with a (partial) rupture of the posterior cruciate ligament.
Category: Knee
Tag: Medi ProductsProduct benefits
- By actively exerting a force via the PCL protection pad the tibia is holding in the desired position
- Safe collateral stabilisation by rigid frame
- Extension and flexion limitation protects against damaging joint movements and relieves injured structures
- Optimal imitation of knee movement by using patented physioglide Hinge Technology
- Limitations:
- – Extension limitation: 0°, 10°, 20°, 30°, 45°
- – Flexion limitation: 0°, 10°, 20°, 30°, 45°, 60°, 75°, 90°
- – Immobilisation: 0°, 10°, 20°, 30°, 45°
Donning/fitting instructions
Open all straps and pull them through the belt eyes. In order to prevent the the Velcro® from causing damage to clothing, for example, fold the end of the strap back on to it.
Pull the knob out of the tibia support. A click confirms the correct position. Pull the tibia support out towards the back until it stops. Bend your leg to ~70° and put the that you have put the brace on properly. The brace has been put on properly if the joint centres are located at the top edge of the kneecap and they are positioned slightly behind the side central line of the leg. Now fasten Belt No. 3 for the thigh and pull it tight. Make sure that you don’t position the brace too far forwards.
Turn the knob back in to activate the turning mechanism. Another click will confirm the correct position. Now turn the wheel to the extent that the tuberosity of the tibia (protruding bone at the top end of the shin) is level with the one on the healthy leg.
When required and for purely stabilising purposes, please fasten the tibia belt. This must always be the last belt to be fastened.
Now move the knee lightly a few times and check again that your have put the brace on properly. Make any necessary corrections.
The indicators on the side on the guide bars may be used as a reference point for the position of the tibia support.
Wearing directions
Only change the extension and flexion limits on instruction from your doctor or orthotist. In order to prevent hyperextension, always insert extension wedges or 0° wedges. The wedges define the exact excursion of the orthosis. In difficult soft-tissue conditions, e.g. where the soft-tissues are under compression, it may be necessary to insert the larger wedge to limit the joint movement to the desired excursion. In addition, make sure that the orthosis joints are correctly positioned: the middles of the joints should be level with the upper border of the patella. The joint must lie behind the midline of the leg.
Be the first to review “M.4s® PCL dynamic” Cancel reply
Related products
Quick View
Quick View
Quick View
Quick View
Quick View
Quick View

Quick View
Sater International – Carelax Company seeks to provide quality health care products and excellent service that help patients to ease their pain and gain high quality medical equipment and products through reasonable prices.
Contact Details
The Middle East & Africa Representative
Head office: Sater International – Carelax, Airport Rd,
Bella-Casa Bldg,2nd floor, Beirut, Lebanon
Main branch: Sater International – Carelax, Airport Rd, Bella-Casa Bldg, ground floor Beirut, Lebanon
Tel/Fax: +961 1 451245 | +961 1 451845
Hamra branch: Hamra Clemenseau Street,
near CMC Hospital,
Beirut, Lebanon
Tel/Fax: +961 1 371850
Reviews
There are no reviews yet.